easy recipe

Put that in your pot and crock it.

Whoever invented the slow cooker deserves a Nobel Prize. I’m not kidding. Economics, Peace, Medicine… any one of them would fit. You put almost any combination of things into it, and four to ten hours later (depending on your patience level) you have a delicious thing to eat that doesn’t bust the budget, and makes everyone feel good. Usually, there are even leftovers.

I’m probably preaching to the choir, right? YOU know.

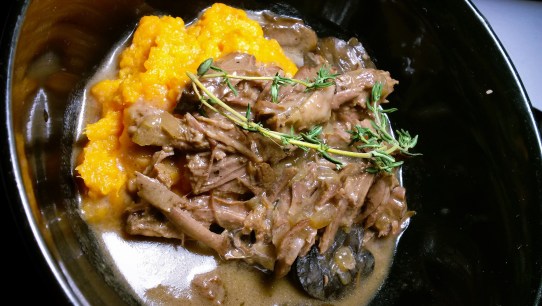
So, consider today’s recipe for Pot Roast with Mushrooms as an ode to the slow cooker. It’s not necessarily an original, but it’s a go-to for me. It’s gotten a little bit of tweaking over time, so I feel pretty confident in guaranteeing a scrumptious end result, and if you’re lucky, enough leftovers for pot roast sliders later in the week.

Equipment:
1 Slow cooker
1 large saute pan
tongs or something to flip a large piece of meat
1 cup measuring cup
Knife (for slicing mushrooms, if you don’t buy the pre-sliced ones)
Possibly a can opener, if you get canned broth/stock
Mixing spoon or whisk
Large pot, if you intend to further reduce the mushroom gravy at the end.

Ingredients:
1 4lb chuck roast
Salt and Pepper
1 T olive oil (or canola, or any vegetable oil, really)
3 cups beef stock
2 1/2 cups mushrooms
1 packet onion soup mix
2-3 sprigs of fresh thyme

Directions:
1. Season the chuck roast well on all sides with salt and pepper. Add the oil to the saute pan and heat until the oil is shimmery. Add the chuck roast to the pan and sear it well on all sides. You’re not trying to cook it through, just give it flavor and color. Remove from the pan and set aside.

2. Don’t forget about all those lovely brown bits on the bottom of the pan! That’s flavor, too, and we don’t want it to go to waste. Add about half a cup of your stock to the pan to deglaze, scraping up all the brown bits. Pour the deglazing liquid into the crockpot, along with the rest of the stock. Add the onion soup mix and stir or whisk to dissolve into the stock.

3. Stir the sliced mushrooms into the liquid, and add the fresh thyme. Then, nestle your roast into the crockpot, so that it’s covered by the liquid.

4. This roast can cook for pretty much whatever time is convenient for you, from 4 hours on high to 10 hours on low. I like to let it go as long as possible on low, if I have the time, because the longer it braises, the more tender and fall-apart-y it gets.

5. Once the roast is cooked through, remove it from the liquid, allow it to cool a bit, then shred it and put it back into the liquid. Alternatively, if you like a thicker, more gravy-like consistency for the sauce, pour it into a large pot, crank the heat to medium-high and allow it to reduce by as much as needed to reach the consistency you want. You can do this while you shred the pot roast, and then add the shredded meat to the gravy.

NOTE: If you decide to reduce the sauce, as described above, don’t add any additional salt until AFTER it’s reduced. If you add salt too early, your sauce flavor with concentrate and may end up too salty.

I served this with a super easy mashed sweet potato side.

Equipment:
Large pot
Potato masher, fork, or whatever you like to use to mash things up
Fork
Colander
Mixing spoon

Ingredients:
5 medium sweet potatoes, peeled and cut into equal sized chunks
6 cups water
1/2 cup evaporated milk
3 T unsalted butter
2 T fresh ginger (the stuff that comes in the tube is fine if you don’t want to deal with fresh)
3 T maple syrup
2 tsp Salt plus more, plus Pepper to taste

Directions:
1. Add the water, potatoes, and 2 tsp salt to a large pot. Bring to a boil, and continue cooking until a fork pierces the sweet potato chunks easily.

2. Strain the water from the sweet potatoes, then add them back to the pot over low heat to help dry them out a little further.

3. Turn off the heat. Add the butter and begin mashing. Add the evaporated milk a little at a time as you mash until all large lumps are removed.

4. Add the ginger and maple syrup. Stir well to combine. Season with salt and pepper to taste.

Dig in!

Squashed Like a Tart

If you’re as big a fan of impromptu get togethers as I am, you probably already have a stable of “go to” recipes for party food at your disposal. You might even be more prepared than I will ever be and have stuff in your freezer that can be  popped into the oven when company drops by without much notice. Knowing this about you, I also suspect you’re always on the lookout for new recipes to add to your repertoire. So… here ya go!

This squash tart is super easy, totally customizeable, and can definitely be made with stuff you might even keep on hand. In fact, there’s no rule that says you have to use squash. I got my inspiration from this recipe on the BBC Good Food website. It’s basically some sort of crust, with some sort of creamy cheese that’s been flavored with whatever you like, and then topped with… something. Once I give you the original recipe, I’ll also give some suggestions on variations.

Equipment:
sheet pan
knife and cutting board
spoon
mixing bowl
parchment paper
saute pan & spatula of some sort plate or bowl to hold the cooked squash for assembly

Ingredients:
1 sheet of puff pastry, chilled (not frozen)
1/2 C Ricotta
1 tsp lemon zest
1/2 T lemon juice
1/2 tsp dried thyme
1 yellow squash and 1 zucchini
2 tsp vegetable oil salt and pepper to taste

Preheat the oven to 350°. Cut the sheet of pastry in half. Fold the edges of each half in to form an edge about 1/2 an inch wide and lay on the parchment lined sheet pan. Put the pastry in the fridge to stay cool while you make the filling.

blog_pastry
Thinly slice both squashes. Don’t stress yourself over trying to get them paper thin. Just try to keep them to about 1/4 inch or thinner. Add 1 tsp of the oil to the saute pan over medium low heat. Add 1/2 the sliced squash and season with salt and pepper. You want the squash to basically just cook through, but not brown. Remove the first batch of squash to a plate or bowl and cook the 2nd batch the same way. Set aside.

blog_squash
Mix the lemon zest, juice and dried thyme into the ricotta, along with salt and pepper to taste.

blog_filling
Get your pastry out of the fridge. Spread 1/4 C of the ricotta mixture onto each tart, then layer the squash over it. You might have extra squash left over. I did, but I just added it to some leftover brown rice with some other random leftover veggies later in the week and it made a really yummy lunch. Pop the tarts into the oven for about 30 minutes. Let cool for at least 20 minutes and cut into slices when you’re ready to serve.

blog_tartdone
This one is delicious. I love recipes that follow a formula rather than demanding that you use specific ingredients, and this is definitely one of those recipes. You could keep everything the same and just change how you season the ricotta and get a whole new flavor profile. Maybe use some whipped goat cheese instead of ricotta. Or keep the filling the same and use tomatoes, roasted asparagus, or sauteed wild mushrooms, or even throw some pepperoni or Serrano ham on there, with or without a veggie.  You could embellish with a little crunch from pine nuts, like in the original recipe, or any other kind of lightly toasted nut, or even some grated Parmesan or Manchego. And those are just the savory options! Imagine mixing some maple syrup or brown sugar and a little orange zest into the ricotta, and topping the whole thing with roasted strawberries or peaches.

See where I’m going with this? Get the basic method down, and the only limit to the possible flavor combinations is your imagination. That’s also nice because instead of having that one thing you whip up or bring to every party, you can make it something totally different from the last time, but without all the stress of learning a whole new recipe. Neat, yes?

If you’re looking for other party food ideas, give these two a try. I tested them out at a little shindig the roomie and I threw at my place a couple weekends ago, and they were a big hit.

Chocolate Dipped Potato Chips: I know it sounds a little weird, but trust me, these are kind of life changing.  Just melt some semi-sweet chocolate chips in the microwave, then dip the chips and let them set in the fridge. I like Wavy Lays vs. Ruffles.

blog_chips
Mini Polenta Pizzas: Inspired by this recipe over at A House in the Hills. Again, this is one that could be topped with all sorts of things, although the ones in her recipe are pretty darn tasty!

blog_polenta
Go forth and party, my lovelies! We have all summer.

I seem to be leeking…

At first, I couldn’t think of any soup puns, but then I remembered there were leeks involved in this recipe and, well, there ya go. The Universe intervened so you didn’t have to feel the deep void that comes from missing out on one of my clever little puns.

Anyhoots, it’s Spring for real. The sun is shining (mostly), and the little buds on the trees are opening. There’s asparagus bigger around than a chopstick in the grocery store. And there are leeks. I love leeks. I love that they’re kinda oniony, but milder, and they’re just so pretty and so many shades of green. I find myself throwing them into everything, because to me they just taste like Spring. So, I was delighted to find vichyssoise on the menu for class last week. It’s such an old school thing to serve, but so easy to pull together. Technically, warm potato-leek soup is called something else, while it’s the cold version that bears the name vichyssoise, but that’s the only difference. I actually prefer the warm version, but that’s neither here nor there. It’s tasty, and light, and a snap to throw together. All the ingredients are easily obtained this time of year, and none of them are terribly expensive, so despite the fancy French sounding name this soup does not require a special occasion. Because it also doesn’t need strict temperature control, it travels well. Pack up a container or a thermos of it for a picnic. Half a sammich and a piece of fruit and you’ve got a pretty delicious little lunch on your hands.

Just one note on leeks. They’re grown deep in very sandy soil. The bottom part is white because it doesn’t see sunlight. It can get pretty dirty in between all those layers, which means you need to wash your leeks really well before you use them in anything. This leek cleaning tutorial from Simply Recipes is great.

Equipment:

Medium soup pot
Knife and cutting board
Potato peeler
Spoon
Blender

Ingredients:
3 C (12 oz) leeks, white part only, sliced
1/4 C unsalted butter
1/2 C white onions, 1/2 in. dice
2 C potatoes, peeled, 1/2 in. dice
3 C (24 oz) chicken stock
3/4 C milk
1 C heavy cream
1/3 C snipped/finely diced chives (for garnish)

blog_meez
Split the leeks lengthwise, wash well to remove all sand and grit, then slice them.

Heat the butter over medium heat and add the leeks and onions. Cook slowly, browning them very lightly.

Add the potatoes and chicken stock, season with salt and pepper, and bring to a simmer. Simmer until the leeks and potatoes are very tender, approximately 45 minutes.

blog_simmer

Puree the soup in a food processor, blender, or food mill, then run through a fine strainer. Note: I actually skipped the straining step. Most really good blenders can puree this well enough on the first pass that straining becomes pretty unnecessary. You will probably want to puree it in a couple of batches to make sure you can get it completely smooth, and to avoid the inevitable volcanic eruption that happens when you overfill a blender with hot liquid.

Return puree to the heat and add the milk and ½ cup of cream. Season to taste and return to a boil.

Let cool, then add remaining cream. Chill thoroughly before serving, garnished with snipped chives.

blog_end

Easy, right? The 45 minutes of simmering gives you time to pull the rest of the meal together. Or clean up a little. Or mix yourself a beverage. Or maybe even take a nap.  I support you, however you choose to utilize your simmer time. Do you consider the “inactive” cooking time in recipes an opportunity to relax, or do you stay in the kitchen the whole time? Let me know in the comments!